To Create Custom Tool Button & Gallery
Follow these steps to create New Button on ribbon and add components to the Components Gallery for newly created button. The example below explains the procedure for OpenPlant PID, but it is also applicable for OpenPlant Modeler and OpenplantSupport Engineering
- Launch OpenPlant PID CONNECT Edition in your desired workset
-
Open
PIDProjectSymbols.dgnlib
from desired workset location & click on
Open.
Here taking example of Imperial Workset. It is by default located in the -C:\ProgramData\Bentley\OpenPlant CONNECT Edition\Configuration\WorkSpaces\OpenPlantExample\WorkSets\Imperial\Standards\OpenPlant\PID\DgnLibs\
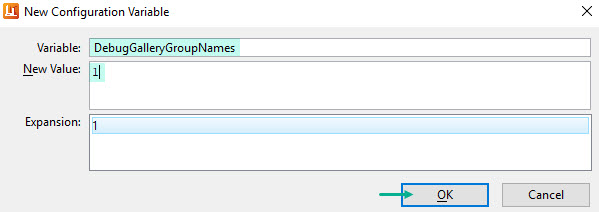
- Add a new configuration variable DebugGalleryGroupNames
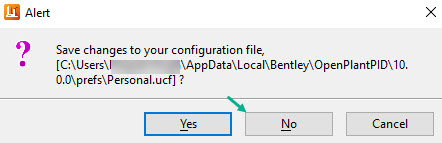
- Once done, click on OK to Configuration Variables. This will pop an Alert message, click on No. Refer image below.
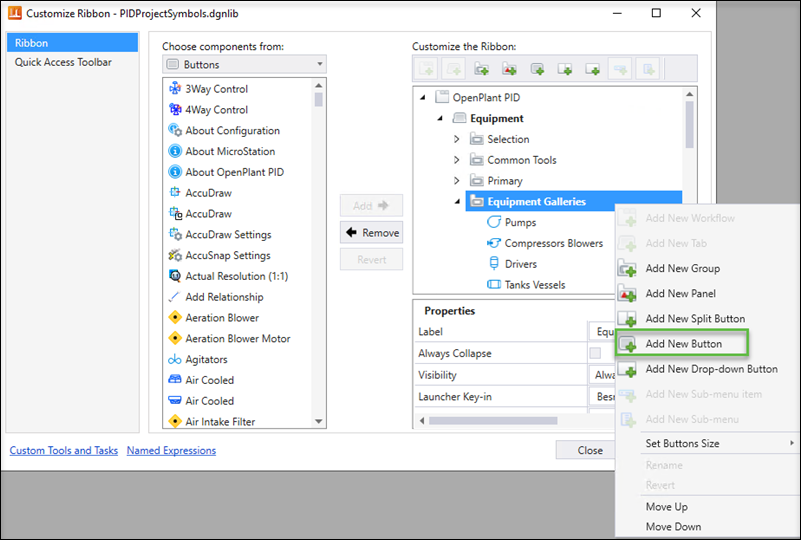
- To add Custom button do one of the following:
- In the list below Customize the Ribbon, navigate to the desired workflow, tab, and the group in which you want to add the new button. For example,
-
Click
Add New Button.

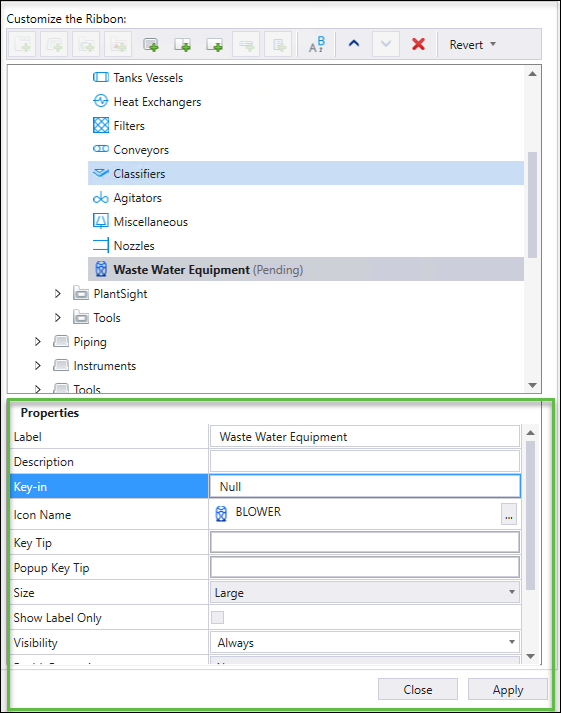
- (Optional)
In the
Properties section, set the following:
-
To change the label of the button, enter the new label in the
Label field.
For example Waste Water Equipment
-
In the
Key-in field, enter the key-in that should
be executed when the button is selected.
To see list of the other hidden defined Gallery Ribbon names which are used for Key-in Click Here
To make this button functional, you need to create a new group under PID Gallery Components & add components into it. Once done then enter required key-in for your created tool button.(See steps 6,7 and 8 from next procedure below.)
- To change the icon, in the Icon field, click the Browse button on the right-side. The Define Icon for Tool dialog opens, from where you can select the icon for the new button or menu-item.
- To set the visibility, select the visibility expression from the Visibility drop-down list.
- To set the enable/disable criteria, select the named expression from the Enable drop-down list.
- Set other fields, as desired.
-
To change the label of the button, enter the new label in the
Label field.
- Click Apply. Selected icon will be displayed for custom added button.


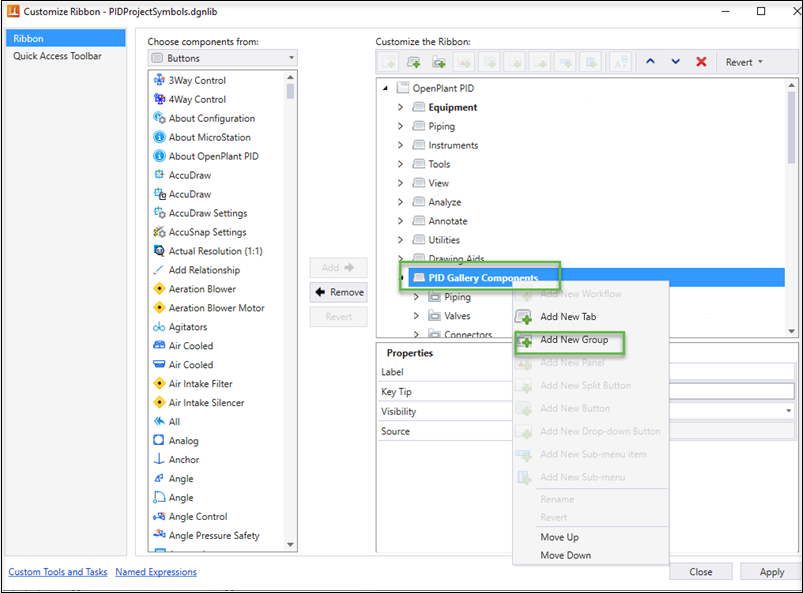
Adding a new ribbon under PID Gallery Components node
After creating the new button labeled as Waste Water Equipment . You need to add components in the Component Gallery for this button.
- From Customize Ribbon dialog, go to PID Gallery Components node.
- Right mouse & select Add a New Group.
- Enter desired group name here Waste Water Equipments
- From Left hand side, select the desired component that needs to be added.
- Select the component & click on Add. Once done click on Apply.
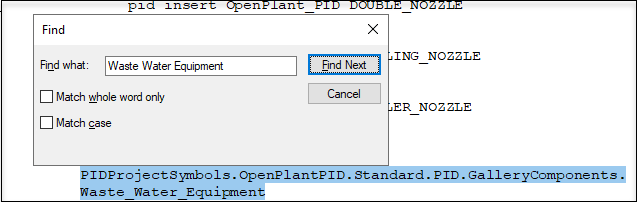
-
Click on message bar & open the
DebugGalleyGroupNames.txt file from mentioned
file location.
Message center shows Gallery Debug file is created.
- Search for added Group Name (under PID Gallery Components) in DebugGalleyGroupNames.txt here Waste Water Equipment.
- Copy the highlighted command name as shown below.
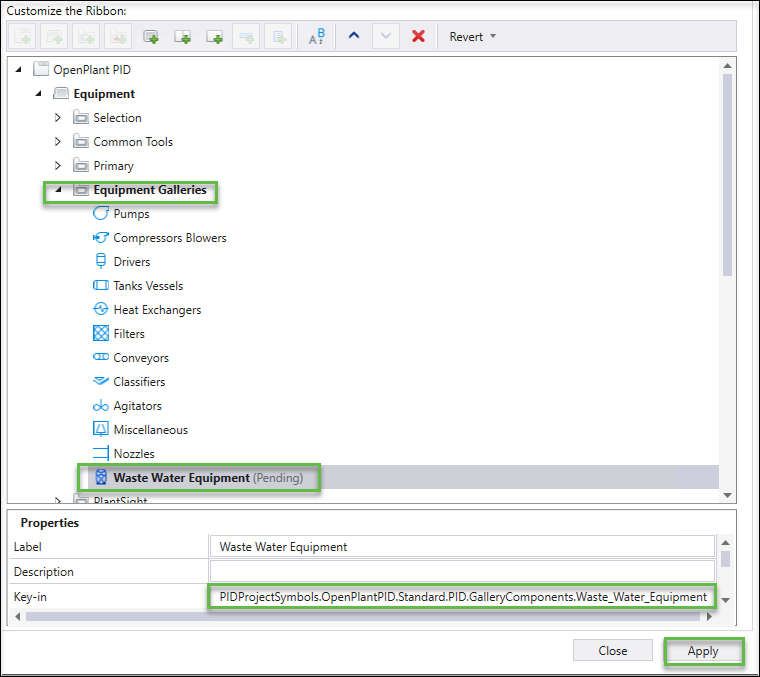
-
Switch to
OpenPlant PID , from Customize Ribbon.
Expand the added tool button under
Equipment parent node created in
step 7
Waste Water Equipment in earlier procedure.
From Properties, enter
Key-in value
Key-in: Besm MenuContext<copied command line from text file from Step 8>
Besm MenuContext PIDProjectSymbols.OpenPlantPID.Standard.PID.GalleryComponents.Waste_Water_Equipment
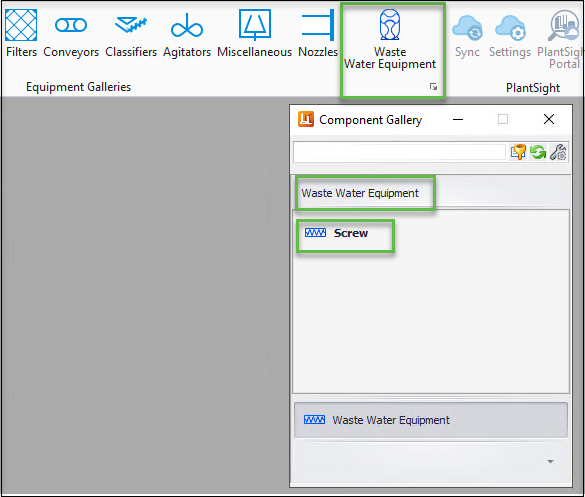
- Click Apply and close the Customize Ribbon dialog
- Based on changes, custom tool button, tool icon & gallery, the component can be seen to OpenPlant PID CONNECT Edition application.


Key-in Details for Addition of New Button/Icon
Key-in: Besm Menucontext PIDProjectSymbols.OpenPlantPID.Standard.PID.GalleryComponents.Waste_Water_Equipment
Key-in breakdown
| Value | Description | Comments |
| Besm Menucontext | Required - from code | |
| PIDProjectSymbols | Name of the DgnLib file being used for customization | |
| OpenPlantPID.Standard.PID.GalleryComponents | The main tab section | This tab is hidden from the administrator. Development supplied the name. |
| Waste_Water_Equipment | Label for the Gallery Group. This matches the name given to the PID Gallery Components group created in the first section of this procedure. |
Here's a list of the other hidden defined Gallery Ribbon names of different Bentley applications. These are used in the Key-in creation: